
Resorts like Bansko have perfect training areas (such as Banderishka meadow), but before you get there, it's critically important to prepare yourself theoretically. Understanding the biomechanics of skiing will save you dozens of falls, muscle soreness, and unnecessary frustration.
In this massive guide, we'll break down each movement into its component parts. Based on the world-famous video tutorial by Stomp It Tutorials (viewed over 6 million times), we'll walk you through the 10 golden rules for beginner skiers - from properly lacing your boots to your first smooth turns.
Visual perception is key when learning to ski. The video below shows every move perfectly. To watch it with Bulgarian subtitles, do the following:
- Start the video and click on the icon Subtitles (CC) in the lower right corner.
- Click on The gear wheel (Settings) next to her.
- Choose Subtitles/CC ➔ Auto-translate (Automatic translation).
- Find and mark Bulgarian (Bulgarian).
Video: 10 Key Skills for Beginners. Source: Stomp It Tutorials
1. Reading the ski map and choosing terrain
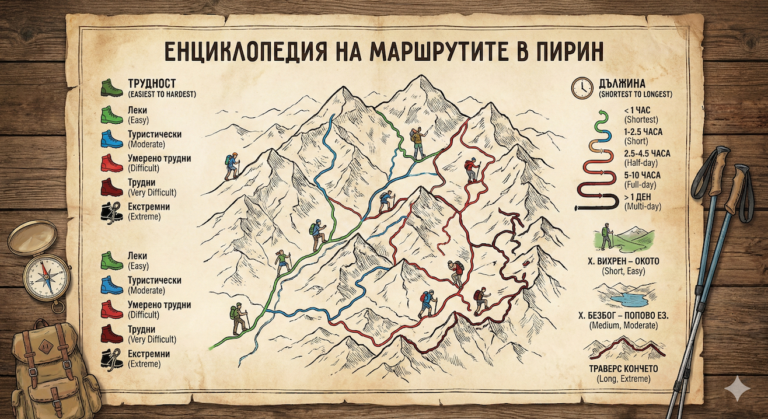
The first step does not happen on the snow, but in front of the large information board at the Base Station of the Bansko Gondola. Many beginners make the fatal mistake of following their more experienced friends into terrain they are not ready for. The ski slopes have an international color code:
- Green (Ski trails): Extremely sloping, ideal for moving around, but sometimes too narrow for exercising.
- Blue runs: This is your home! In Bansko, slopes like “Kolarski pat” (№1) or the light sleeves of “The Shiligarnika”"offer a broad and safe terrain for learning" how to ski.
- Red and Black Runs: A no-go zone for your first few days. The slope there is unforgiving of braking mistakes.
2. Full control over equipment
If your equipment makes you uncomfortable, you won't learn anything. Most people hate ski boots, but the truth is that they are the most important communication tool between your body and your skis.
The secrets of ski boots and automatics
Lace your shoes from the bottom up, but pay the most attention to the top two laces (which tighten the shin). Your foot should not move inward, your heel should not lift. When you are standing straight, you should feel the tongue of the shoe on your shin at all times.
Before you step into the ski's automatics, always tap your boot with a pole to clear any packed snow. If your sole is full of snow, the automatics won't click properly and the ski could come off at the most dangerous moment while you're on the move.
3. Moving on level ground: First feeling of snow
When you exit the gondola at Banderishka Polyana, you will step onto flat terrain. This is where you will realize how slippery the snow really is. Don't rush to find a slope. Spend at least 15 minutes on the flat.
Use your poles to push off simultaneously (like cross-country skiing). Then try the “skating” step. To do this, open the tips of your skis slightly outward (in a V shape), shift all your weight onto one foot, step on the inside edge of it, and push off to slide with the other foot. This move develops phenomenal balance.
4. The art of taking a lift
Many beginners say they are more afraid of the lift than the descent itself. Let's demystify the process.
Tows (Pan / Anchor)
These are the facilities at the training ground. The golden rule here is: NEVER sit down! The tow bar is designed to pull you up while you are standing. If you sit on the board, all your weight will fall back, your skis will spread apart, and you will fall instantly. Keep your skis parallel and look forward.
Chairlifts
To successfully climb (e.g. onto the Kolarski lift), hold both poles in one hand. When it’s your turn, slide to the waiting line. Look back over your shoulder at the coming chair, bend your knees slightly, and sit down smoothly. Immediately remove the safety board. When descending, lift the board just before the end, lift the tips of your skis (so they don’t get stuck in the snow), stand up smoothly when you feel solid ground, and just let the chair push you forward slightly.
5. How do we walk up the slope?
You will often have to climb a few meters up to retrieve a dropped glove or reach a friend. You have two techniques, since skis cannot move straight up:
- Side-step (Stairs/Side-step): Stand perpendicular to the slope (your shoulder pointing up towards the top). Step foot to foot, driving the top (inner) edges of your skis hard into the snow to keep from sliding down.
- Herringbone: If the slope is gentle, open the tips of your skis wide outward, bring your heels together, and step from edge to edge, moving forward and up.
6. Falls and (more importantly) how to get up gracefully
Accept the fact: you're going to fall. It's part of the process. If you feel like you're losing control and stepping dangerously, it's better to land on your side in a controlled manner than to hit someone.
The problem comes when you get up. If you try to stand up while your skis are pointing down the slope, they will immediately go away. The correct technique: Roll onto your back (“dead bug pose”), lift your legs in the air, and rotate your skis so they are perpendicular to the slope. Make sure your body is over your skis (towards the top), bring your hips closer to your boots, and push yourself up with your hands over the top of the ski.
7. The Beginner's Holy Grail: Stopping with a Plough“
The “plow” technique (also called “pizza slice” or Snow Plow) is the first and most important speed control and braking mechanism.
How to do it correctly: As you slide slightly forward, bend your knees and simultaneously push the heels of both skis as far outward as possible, keeping the tips together (about a span apart). Press the inside edges of your skis lightly into the snow. The wider the back of your “pizza” becomes and the more you press the inside edges, the faster you will stop.
The two most common mistakes here are: first, you bring the tips together so close that the skis overlap (which leads to a fall). Second, you lean back out of fear (weight goes to the heels). In skiing, Leaning back means acceleration and loss of control. Always keep your weight forward, pressing your shins against the tongue of the shoe.
8. Sideslip (Emergency brake)
If you ever come across a section (for example, the icy terraces around the Bansko mid-station) that seems too steep for your abilities, the Side Slip will save you. Stand completely across the slope. Drive the upper (towards the top) edges of the skis into the snow – this way you stand in one place. To move down, simply slightly relax your ankles forward, releasing the angle of the edges. The skis will start to slide slowly sideways down. When you want to stop – “bite” the snow with the edges again by tilting your knees towards the hill.
9. Evolution: Parallel Turns
Plow turns are great to start with, but they are very tiring on the legs and not suitable for high speed. The real riding begins when you move on to parallel turns (parallel skis).
The transition happens step by step: Start the turn in a “plow” position. When you pass the fall line and start to head across the track, transfer the 80% of your weight to the the outer corner (If you are turning right, the weight is on the left ski.) This will lighten your inside ski and allow you to slide it naturally so that it is parallel to the outside ski. Practice this on blue runs until the movement becomes automatic.
10. Jumping in place and finding the center
The last point may sound scary to you – jumps for beginners? Actually, we are not talking about acrobatics in the snow park, but about a small bounce (pop) on the flat. Try bending your knees and jumping slightly in place so that both skis are separated by a centimeter from the snow. If you fall backwards on the bounce, then your weight is wrong. This simple exercise perfectly “calibrates” your center of gravity and teaches you the balance that you will need when going over baboons and uneven snow.
It's time for snow practice!
Theory is the foundation, but without properly selected, modern equipment, training will be agonizing. Save yourself time and nerves by renting equipment from proven professionals.